This is the fourth part of the DAW project organization series and in this post, I will take a closer look at the DAW session routing. You will get a detailed insight into my routing of all the tracks inside my recording and mixing session, as well as into my I/O setting of inputs and outputs. This routing layout, including the Aux setting, builds together the whole session routing in my DAW for the music and podcast production.
DAW Session Routing
A mixing session can involve very extensive and complex routing. After all, if you route audio tracks to different buses, use several effects for individual tracks or instrument groups, and possibly use parallel compression, it can quickly become confusing.
However, for a tracking session, you need a lean and simple routing. Using plug-ins such as a compressor or an EQ on the track to be captured during recording is already common practice. This allows you to create the sound you want for the mix while recording. But in my opinion, you don’t need any kind of sound shaping tools on the buses or groups during recording.
If you can keep the monitoring path as simple as possible during tracking, the more you can focus on the recording and the musical performance.
As soon as you have several microphones for one instrument, such as drums, which all work together, they can be routed to a common group bus during the recording session. This gives you joint control over this instrument group, specifically POST group insert.
Alternatively, you could also control all tracks from the drums with a VCA fader (if your DAW allows you to use VCA faders and control them). A VCA fader controls all channels assigned to it, but then again PRE groups/sum insert. So these are two different controls for one instrument group inside your DAW session routing.
You could apply something similar to different instrument groups or vocal tracks, such as a miced guitar cabinet with two microphones, a background vocal group, or a stereo recording of an acoustic guitar.
With an average track count of 30 or 40 tracks in a rock song (and that’s probably still pretty low when you look at modern productions of up to 100 tracks) it can get confusing.
Don’t lose control
During a recording session or later when mixing, things will become more complex in terms of routing. In recent years, my sessions, whether they were my songs or productions for other artists, had between 20 and 50 audio tracks. Then there are the aux tracks, groups, and summing buses. It’s easy to lose track and control and waste a lot of time trying to find your way around. The positive alternative is a structure in your routing, setup, and presets as well as the use of templates.
If you have to create all groups with their inputs and outputs, assignments, and settings from scratch in every new recording session, this is an unnecessary effort. Once prepared and saved as presets, these known settings can be used again immediately as your DAW session routing preset. Naturally, this assumes that you know what you need and how it works best in your workflow.
This will evolve over time and of course change with your experience. You will certainly change your templates and presets from time to time and adapt them to new routings or working methods. But the basic framework and the basic idea behind your structure will remain the same.
In the following sections, I would like to give you an insight into how I manage my session and the associated routing.
Inputs & Outputs
In ProTools (Studio version) you have four windows in the I/O settings to configure the inputs, the outputs, the buses, and the hardware inserts.
The following routing options are available in the Pro Tools Studio version:
- Buses (Routing): Unlimited
- Aux tracks/routing folders: 128/128
- VCA tracks: 128
- Master tracks: 64
- Simultaneous recording inputs: 64
- Aux I/O inputs/outputs = unlimited/32
There are more than enough options here for my modest needs. If you work with another DAW, you will either find similar possibilities or even a higher number or no limitation, depending on the version you use.
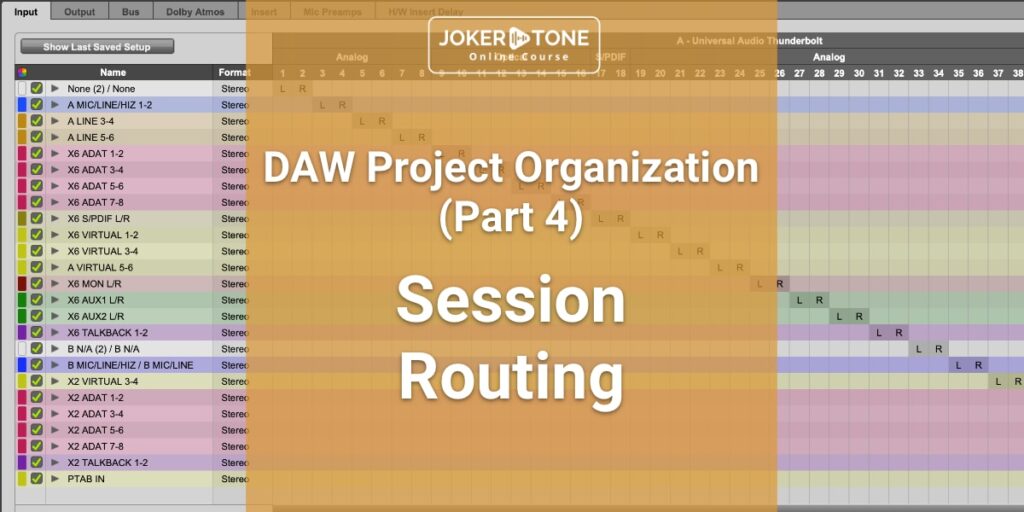
I currently use a Universal Audio Apollo interface system and have 24 inputs and 28 outputs (analog and digital combined).
The configuration of the inputs and outputs is quite simple. For each input and output there is a stereo path (2 tracks) with the mono tracks as sub-paths. The names of the inputs and outputs in my DAW session routing are deliberately kept as short as possible and as long as necessary.
- X6 M/L/I 1 stands for the UA Apollo X6 Microphone Input 1, where the input can be used for different sources via a switch on the device to mic, line, or instrument level.
- X2 Line3 stands for the UA Apollo TwinX Line input 3
The Apollo system has a digital mixing console interface called UA Console. Depending on the configuration, additional virtual channels are available here (up to 4 stereo or 8 mono channels per interface device). These can also be used for routing in and out of the DAW. For over-dubbing, I use Mic 1 from the Apollo X6 as an example and listen to the direct live signal via the Apollo’s output. To hear the playback from Pro Tools, I route the playback from Pro Tools via a digital bus to Apollo X6 Virtual Channels 1&2. From there, I have volume control over audio sources, the live signal, and the playback in the UA Apollo Console.
For the outputs, a similar rule applies concerning naming. However, there is another setting to note here when routing. Before the assigned outputs can be used, they must also be set in the routing setting of the buses.
Pro Tools also offers the option of additional digital AUX interfaces in the version I am using. It is called the Pro Tools Audio Bridge. This means that different numbers of tracks can be routed in or out of Pro Tools digitally using the AUX IO setting. Here are two examples of the AUX I/O:
AUX input:
The AUX input can be used to route the audio sound from the Mac or apps such as Music/iTunes or a YouTube clip played inside the Safari web browser directly into the Pro Tools session.
AUX output:
When I record my courses with the Joker Tone Course Project, I route the audio signal from Pro Tools via the AUX outputs into the Screen Recording app to make the mixing sound from the session audible to the students.
AUX-Bus Naming
Although I don’t use the full number of available AUX buses by a long shot, a certain naming scheme has helped me to quickly find my way around each session when it comes to routing.
When I started using Pro Tools myself, I quickly began numbering the AUX buses so that I could always see a familiar and uniform sorting of the buses. But as this session and also the routing became more complex and larger, I almost completely dropped the numbering. This has remained for my main outputs. As these were always at the end of the session, they always had the 90s numbers.
- 91-PT2Track
- 92-PT2Rec
- 93-Bounce
The main group buses have also kept the first number:
- 1-DRUMS (all drum tracks)
- 2-BASS (All bass tracks)
- 3-GIT (All guitar tracks)
- 4-INST (All additional instrument tracks)
- 5-VOX (All vocal tracks)
- 6-FOLI (All audio effects, samples — if required)
There are additional AUX buses and naming conventions:
- gr = stands for a group of individual instruments
- pc = means parallel compression
- dly = delay
- verb = reverb
- room or ro = room
- dis = distortion
- STEM = stem recording channel for re-recording an instrument group
- ReRec = is used to re-record external signal processing (e.g. by an external hardware compressor) in the DAW.
- Trig = Trigger Bus
Lastly, there are the hardware inserts for which the routing can be configured. Here, the inputs and outputs must be on the same “rows”. So input 3 leads to output 3 again.
I currently have a stereo bus compressor as an insert on input/output 3&4. For my DAW session routing, I can call up this insert as a hardware insert in Pro Tools like a plug-in slot. The signal is first routed out through the output, into the external hardware compressor. After the procession outside the computer, it goes back into the DAW via the inputs of the same row (3&4) before it is routed to other plug-ins, the buses, and the fader after this slot.
Complex routing
To implement complex routing tasks, there is no way around a sensible structure. Consider the example of a choir. You have 5 individually recorded vocals that sing background melodies together in a choir.
Some of these tracks may require individual processing, but you can also perform some processing such as compression on the sub-group of the choir. In addition, you don’t need an individual aux output for each individual choir for the effects but can use the “grChor” sub-group for this.
The choirs generally belong to the background vocals and therefore run on the background vocal group “grBGV”. Before it goes to the final summing bus, all the vocals join together on the last vocal sub-bus “VOX”. From here, they then go to the final summing bus, the “2Bus”.
Shown as a chain: Choir Single Tracks → grChor → grBGV → VOX → 2Bus
Track Folders
Track folders are very helpful for organizing a large session. Pro Tools offers two types of folders for the DAW. Normal “folders” that have no other function than to display all assigned tracks expanded and collapsed. For the DAW session routing, AVID has developed the folders in Pro Tools into so-called “routing folders”. These not only take over the visual tasks of a folder but also serve the routing like a sub-BUS or group bus.
I really like working with the routing folders, and they have made my DAW session routing much easier.
Conclusion on DAW Session Routing
With well-thought-out session routing, you always have an overview and can simply display complex routings. It will be easy to minimize even large sessions, and you can concentrate more on sound shaping than wasting time searching and orienting yourself within your session.
It will certainly take some time and experience to create the best session routing for you. However, once you have created a basis here, you can import it into other sessions at any time and feel well-organized everywhere.
Do you have any tips or special features in your session routing? I look forward to hearing your opinion and settings!
If you have further questions or want to get in contact, please consider using the contact form
Niels from Joker Tone Course